This feature is sometimes called facility billing.
In addition to the standard CMS-1500 and UB-04, the program can print custom designed invoices based on the claim data. These invoice reports are treated the same as a CMS or UB claim in terms of recording claim history, submission status, etc.
Obtaining Invoice Reports – If you require a custom invoice to print instead of the standard CMS-1500 or UB-04. Please contact EZClaim for more information. No claim invoices are automatically included in Premier.
Before using a claim invoice, the program will need to be configured by the following steps:
1. Install the Claim Invoice report
a. Contact EZClaim for more information on the cost and availability of claim reports
b. EZClaim will assist in the installation of the report file
2. Activate the Additional Claim Forms in the Add On Services library
a. Contact EZClaim to obtain the activation code
b. Configure the “Additional Claim Forms” on page 195 to activate the additional claim types.
3. Set your Payer library entries to use the claim invoice
a.
Open the Payer Library
b. Select the payer that requires an invoice
c.
From the ‘Claim Type’ drop down, select the invoice to print for this
payer
Claim invoices can be printed individually from the claim screen by clicking the ‘Print’ button in the ribbon bar…
…or using the ‘Print Claims’ window.
When using the Print Claims window, you MUST select the Claim Type to the report you want to print. Otherwise, the list may be blank.
Printer Adjustment
.
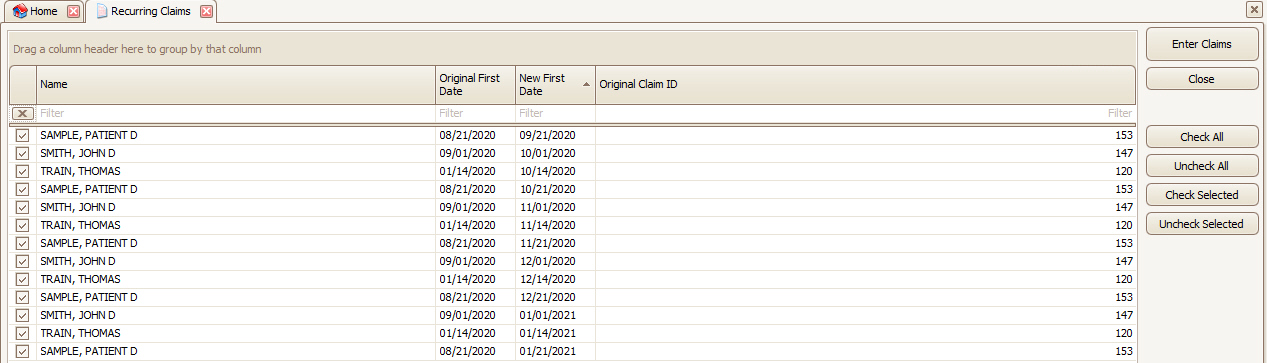
To print multiple claims, click on ‘Print Claims’ from the Home screen or select ‘Print Claims’ from Home tab > Print icon.
Select claims to print by entering a check in the checkbox next to claim or select ‘Check All’.
Click on ‘Print Claims’ to quickly print claims or use the drop-down arrow to select ‘Print Claim’ which will open your printer dialog box, or ‘Print Preview’ to preview claims.
The print claims screen has three filter options:
‘Ready to Submit’ shows claims that:
•Status = ‘Ready to Submit’
•Method = ‘Paper’
•Bill To <> Patient
‘All Paper’ shows claims that:
•Status = Anything
•Method = ‘Paper’
•Bill To = Anything
‘All’ shows all claims that:
•Status = Anything
•Method = Anything
•Bill To = Anything
TIP: If using the ‘red’ forms, use either ‘Preview Only’ or ‘Never’. Otherwise, a black form will print on top of the red form.
If using plain paper and need to print the form and you are using the ‘Print Claims’ window, select the ‘Always’ option in the ‘Print Form with Data’ selector.

If printing from a claim window, the program will use the option set in program setup. See Print Form with Data.
•The responsible party does not affect which service lines are printed on the claim.
•If the ‘Bill To’ is set to Final (Patient), and the claim is printed from the claim screen, the claim will print as a primary claim.
•Uncheck the ‘Print/Export’ service line check box on the Claim screen (available in the column chooser) to prevent an individual line item from printing. One or more service lines must be checked to save the claim.
•If a claim is not showing up on the ‘Print Claims’ list, make sure of the following:
o The claim submission ‘Method’ is set to ‘Paper’
o The claim ‘Bill To’ is set to a payer (not the patient)
o The claim ‘Status’ is set to ‘Ready to Submit’
o The correct ‘Claim Type’ is selected on the Print Claims screen
o You can also change the filter to ‘All’ and all claims will be displayed regardless of the claim status settings.
•Service lines are sorted first by date order then by the order of data
entry. If you want to make sure you know the order of entry, you can add the
SrvID column into the service line grid.
The program DOES NOT export or print
the service lines based on any type of grid sorting. Grid sorting is for the
user only.
•To ‘Lock’ a claim check the ‘Locked’ checkbox on the Claim screen under Claim Information.
To set the default for Locking all claims when printing or exporting, go to Tools>Program Setup>Claims.