 Home Screen
 Home Screen
The ‘EDI Reports’ screen is for viewing and managing EDI reports. EDI Reports are stored with the company file.
•The
EDI Reports window is opened by clicking ‘View EDI Reports’ on the home screen
or  from the ‘Home’ tab or the
‘Electronic Billing tab.
from the ‘Home’ tab or the
‘Electronic Billing tab.
•Double click a report in the list to view it.


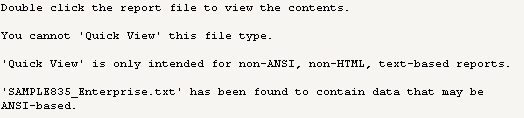
Quick View – The program provides a quick view in the lower half of the window if a quick view is available. If the file needs to be processed before viewing, the quick view window will instruct you to double click the file to view the contents. The Quick View will only show the first 500KB of data. If this happens, you will see ‘[FILE TOO LARGE TO PREVIEW ENTIRELY - DOUBLE CLICK FILE TO ANALYZE]’ in the Quick View area.
Connection Selector - Use this drop-down box to select the correct Connection to download reports. Connections are managed in the EDI Connection library, see EDI Connection Library.

Report Grid – This grid shows all the reports stored in the company file. If a Report is shown in bold, it is a new report and has not been viewed yet. The grid can be sorted and filtered as needed. Multiple reports can be selected if needed for archiving, etc.
Notes – The Note column is for the user to enter notes that they find helpful when managing reports. For some file types such as an 835, 999, or status report, there may be a note entered automatically by the program. The user may then add more to the note or edit as needed.

 - Open -
Open and analyze the highlighted file.
- Open -
Open and analyze the highlighted file.
 - Save
Notes – Saves any notes that have been entered for reports.
- Save
Notes – Saves any notes that have been entered for reports.
 - Export
File – Extracts the file from the company and saves it to your computer.
- Export
File – Extracts the file from the company and saves it to your computer.
 - Get
Reports – Only active if a connection has been selected. This button
will activate the connection and download reports into the company file.
- Get
Reports – Only active if a connection has been selected. This button
will activate the connection and download reports into the company file.
 - Add
Reports – Add reports from your computer into the company file. When
clicked, a browse window will appear allowing you to select a file.
- Add
Reports – Add reports from your computer into the company file. When
clicked, a browse window will appear allowing you to select a file.
 - Refresh
Reports – If others have downloaded reports, this button will reload the
grid and show any new reports.
- Refresh
Reports – If others have downloaded reports, this button will reload the
grid and show any new reports.
 - Close
– Closes the EDI Reports window.
- Close
– Closes the EDI Reports window.
 - Check
All – This button has four options in the drop-down menu.
- Check
All – This button has four options in the drop-down menu.
•Check All
•Uncheck All
•Check Selected – Check the reports that are highlighted.
•Uncheck Selected – Uncheck the reports that are highlighted.
 - Show
Archived – When checked, will show reports that have been archived.
- Show
Archived – When checked, will show reports that have been archived.
 -
Archive – This button has four options in the drop-down menu:
-
Archive – This button has four options in the drop-down menu:
•Archive – Move into the archives. The report is still in the system, it’s just not visible unless the ‘Show Archived’ is checked.
•Unarchived – Move out of archives.
•Mark as Read – Mark the report as read. Will not list the report in a bolded format.
•Mark as Unread – Mark the report as new. Will show the report in a bolded format.
 - Delete
– Deletes any checked reports. Reports cannot be undeleted so be
very careful when deleting reports!
- Delete
– Deletes any checked reports. Reports cannot be undeleted so be
very careful when deleting reports!

Use the EDI Reports search feature to quickly find reports. Enter a keyword such as a Provider or Patient Name or other report data and click on ‘Search for Keyword’.
Notes may be attached to a report. Place the cursor in the Notes cell and type your note. Use the Save Notes button to save any changes. The field will hold 255 characters.
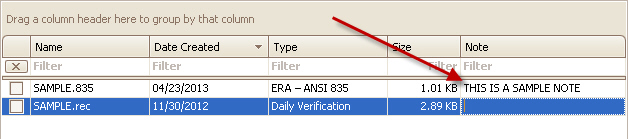
When an ANSI 835 report is added to the grid, the program will automatically read the contents and add the payment information to the note area (provided the note is already blank).
When a TriZetto CSR (Claim Status Report) report is processed by double clicking; the program will add a note showing the number of claims and rejections contained in the file. If you need to view the data contained in the report, open the corresponding DAT report to view in a readable format.
When an ANSI 999 report is processed by double clicking, the program will add a note showing if the batch was accepted or rejected.